
Welcome back to the Worldbuilding Process series. Now, last time we put our attention to Dominion Worldbuilding. If you need a refresher on any of the steps so far, you can find links to the individual articles on the Worldbuilding Process page. Today we’re increasing the magnitude of our worldbuilding process to look at what’s inside an atlas hex. Spoiler alert, it’s region hex mapping.
Part of our introduction to region hex-mapping for your D&D worldbuilding will be discussing how the hierarchy of map hexes all come together like a matryoshka doll. This hex-mapping system allows you to easily transition in scale from an entire world down to a view the size of your neighborhood.
As part of the hex map hierarchy, we’ll discuss overland travel pace in D&D as a short sidebar and why the alternative method I use is much easier to run at the table. We’ll finish today’s topic by showing how to fill an atlas hex with biome variations. But first, we should refresh ourselves on atlas hex basics.
Atlas Hex Mapping Review
Two years ago, we first broached the addition of adding hexes to our world map. Mapping biomes based on latitude is straightforward, using atlas hexes that measure 6° in diameter from side to side. That form factor allows us to neatly stack the pole-to-pole latitude of an Earth-like world into 30 hex rows.
It’s also helpful because Earth’s biome divisions tend to band around latitudinal lines divisible by six. That means we have fewer messy atlas hexes split by different types of biomes. Instead, we varied those large swaths of uniform biomes using number generation.
Then we finished the remainder of natural geography and started on human geography by discussing landmark locations. These are the significant, world-recognizable landmarks in the world. They include major cities, important fortifications and power seats, cornerstone religious sites, monsters of incredible power, critical ruins, and UNESCO-worthy world wonders.
An atlas hex with a landmark location deal with the highest level, tier four, adventures. When a D&D party reaches 17th level and beyond, these are the critical locations to their ongoing campaign. They are no longer visiting hamlets and backwater temples. The player characters are speaking with councils of kings, arch magisters, and the like.
It’s top-down worldbuilding, which also means we have yet to address 80% of the worldbuilding a Dungeon Master may want to use. Each of D&D’s tiers of play coordinates with a level of our mapping. Serendipitous, no? Below is a quick reference to how the hex-mapping hierarchy works together.
D&D Hex Mapping Hierarchy Quick Reference
| Hex Type | Across, Side to Side | Across, Point to Point | Time to Cross | Locations & Challenges |
| Atlas Hex | 360nmi | 420nmi | 36-42 Days | Tier 4 (PC Level 17+) |
| Region Hex | 60nmi | 70nmi | 6-7 Days | Tier 3 (PC Level 11-16) |
| County Hex | 10nmi | 12.7nmi | One Day | Tier 4 (PC Level 5-10) |
| Local Hex | 2nmi | 2.31nmi | One Hour | Tier 4 (PC Level 1-4) |
DM Tip: You can easily create a complete D&D homebrew campaign by starting with a single atlas hex with a Tier 4 adventure location/BBEG. Then flesh out the sub-hex maps to create supporting adventures and locations for every tier of Dungeons & Dragons play.
These hexes also work well when you need to calculate overland travel. A region hex takes about a week to cross, so looking even at our zoomed-out world map, you can count atlas hexes knowing each takes roughly 6-7 weeks to traverse. And looking at the sub-map of a region hex, we could quickly note travel time as each county hex is approximately one day’s travel on foot.
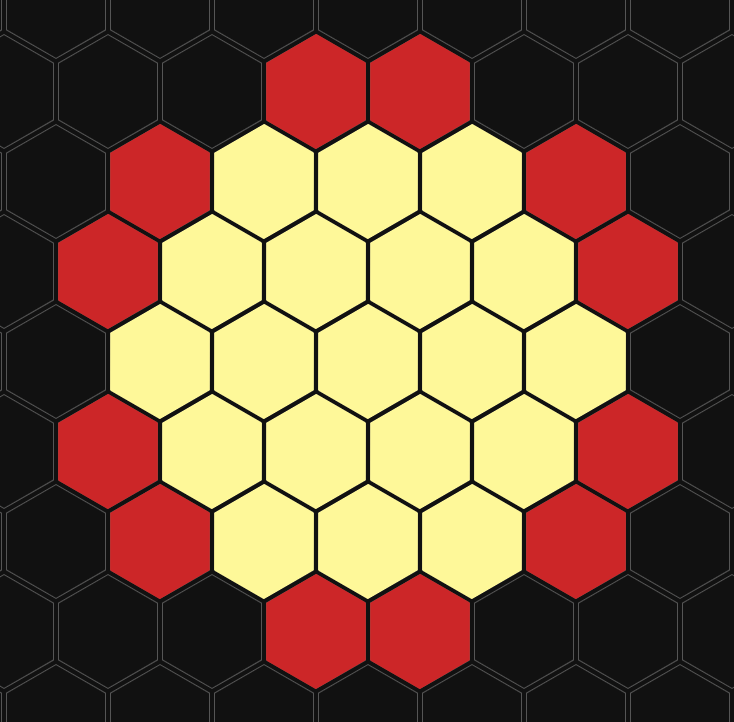
It is important to note that there is a change in the hex-mapping used at the local level. To make the hex hierarchy simpler to scale and math, a county hex is five local hexes across instead of six. You can see the two different sub-hex mapping templates below.
I do want to draw attention to the note that 10nm (11.5 mi/18.52 km) is what we’re considering one day’s travel. Yes, it’s low, but walking isn’t the only thing you will do during overland travel. There’s making/striking camp, wayfinding and asking directions, taking breaks, making and eating food, finding a place to refill waterskins, fighting monsters, investigating scenes, foraging, talking to passersby, etc.
Traveling is much more than just walking. So this comes from my personal backpacking experience and also falls in line with Naismith’s Rule by assuming the party will often not be walking along a smooth and level roadway. So, this seems an excellent place to discuss my approach to travel pace.
Naismith’s Rule
Assume an average three miles per hour trekking speed with an additional hour for every 2000 feet in elevation change. This assumption does not account for delays, stops, orienteering, or terrain traversal challenges.

D&D Overland Travel & Pace Notes
First, when it comes to most travel in the games I run, I handwave it. I don’t see a reason to bog down the game if the adventuring party follows an established road and can stop in an inn to rest each night.
Unless there’s a specific obstacle in the party’s way, they spend a little coin and move on to the exciting part of the adventure. The same is true if the party is only traveling off-road for a few hours with scarce risk they will get lost or need to camp; it gets handwaved.
Tracking overland travel and pace becomes essential when the party travels a long distance. Typically through multiple domains or bushwhacking through the wilderness in search of something.
The problem is tracking overland travel is probably the most unfun aspect of D&D for DMs and players; it’s resource management bookkeeping. At its worst, overland travel is: make a roll, tick off some resources, and repeat ad nauseum until they reach the destination.
Compounding this is that pace is a pain in the butt for Dungeon Masters to calculate. Many variables go into pace and travel distance, like altitude, weather, incline, terrain, fitness level, encumbrance, visibility, horses and beasts of burden, etc.
So I said, forget all that. I use the basic backpacking rule of thumb: one mile every thirty minutes and convert it to nautical miles, so we have a little bit of a faster pace but still under the average three mph walking speed.
Using the backpacking rule of thumb, my county hexes work out to about 5.75 hours of travel. The average pace here assumes the PCs might have an encounter, need to clear a path, take breaks, or spend time getting their bearings to avoid becoming lost.
Alter Difficulty, Not Pace
The pace I use is static; it’s a constant. Instead of focusing on how fast the party travels, I focus on how difficult it is to travel. Because life outdoors on the road is challenging, the party must push themselves to keep going day after day.
During travel, the party must make Constitution saving throws with a base difficulty equal to the number of hours, days, or weeks (depending on the total length of overland travel to the next settlement or safe haven) since they last stayed in accommodations or rested a full day in camp.
So if they’re running around the nearby woods looking for the forgotten temple of the toad king and it’s been five days, it’s a DC 5 Con Save. Then, I’ll impose advantage/disadvantage on the roll or adjust the base DC depending on weather, terrain, desert conditions, or using vehicles/mounts, as they make sense.
If the player characters succeed, everything goes as expected. On a failure, the PC(s) instead gain a level of exhaustion that requires staying in accommodations or resting a full day in camp to recover.
I find this alternative take on overland travel and pace much easier to run at the table and more interesting as players may find their resources and time pinched due to bad rolls. And each time they rest in camp, there’s another chance of a random encounter. Or, they may decide to take one or more levels of exhaustion to save time and gamble they don’t run into a random encounter.
Remember that anytime Dungeon Masters present players with meaningful choices and risks to take, we’re doing it right. That’s DM success.
What is a Region Hex?
All right, now that we’ve recapped atlas hexes and talked about the hex-mapping hierarchy and how it works, we want to know what is a region hex. Well, a region hex offers the next level of detail for a world map after the atlas hex. In atlas hexes, our world map measures 60×30. If we made a whole world map of region hexes, it would be 360×180.
Obviously, that’s not what we want to do. A map of near 65,000 hexes provides more complexity than usefulness. Region hexes more accurately showcase the details of a small number of atlas hexes, for instance, a hex flower of seven atlas hexes.
Drawing down this scope allows us to put a more precise location for any atlas hex landmark locations and show more detail and variation of the landscape and biomes within the highlighted atlas hexes.
A Hex Map Sandbox for Tier 3 Adventures
A single atlas hex offers an area of 3,182.64 square nautical miles. And in addition to landmark locations and variations in the natural geography, we Dungeon Masters can stock those region hexes with notable D&D Tier 3 (party level 11-16) adventure locations and challenges.
As noted in the hex-mapping hierarchy table above, each region hex is 60 nmi across (one degree of latitude) with an expected 6-7 days of travel to get from the center of one region hex to the next. So, we can quickly count hexes and estimate how many weeks it will take to travel between locations on a map at this scale.
It’s handy as a table aid in that fashion, especially when coupled with the alternative rules for travel pace. Enter a new hex, and make a Constitution saving throw to see if anyone’s exhausted. Simple and clean.
The big question now is how do we populate those region sub hexes?
Populating an Atlas Hex with Region Hexes
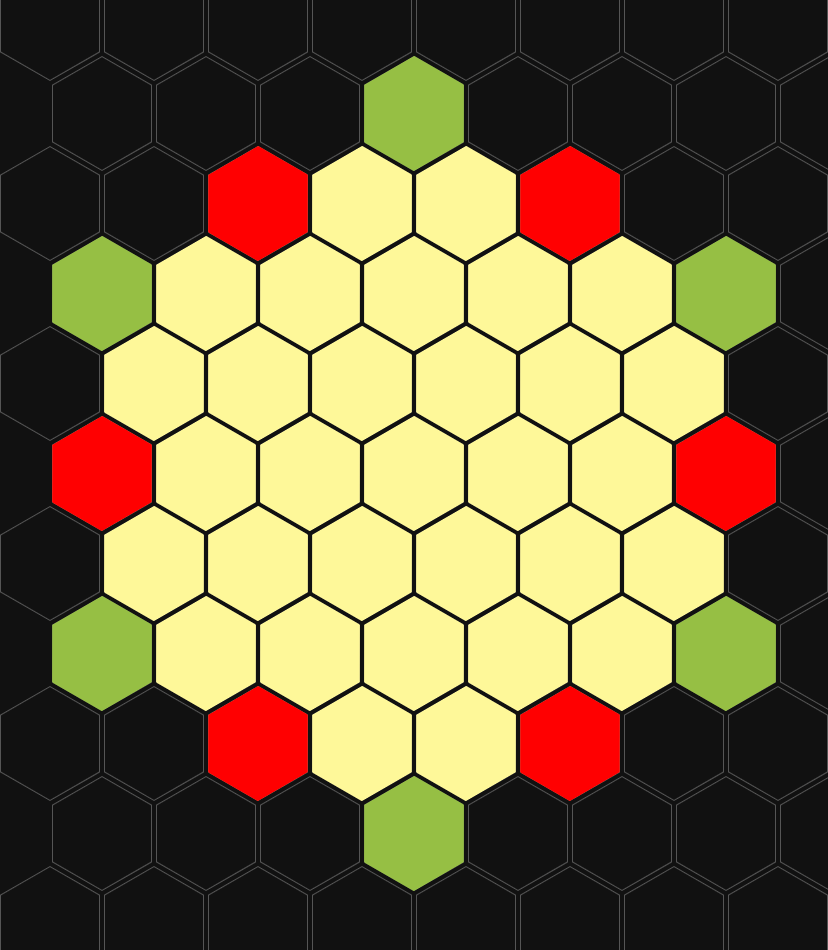
In the appropriate diagram above regarding sub-hex mapping, we can see 31 sub-hexes comprising the parent hex. Additionally, there are six two-parent “side” hexes and six three-parent “point” hexes. First, let’s look at how to populate a sub-hex map with biomes.
Region Hex-Mapping: Biome Variation
We start with the primary biome of our parent hex, and we will use a 2d6 biome variation to fill all the primary hexes using this method. Below is a snapshot of the 2d6 table.
2d6 Biome Variation Roll Table
Heavy Forest <> Forest <> Lt Forest <> Grasslands <> Scrub <> Desert

2 - Water
3 - Wetlands (Bog, Fen, Marsh, or Swamp)
4 - 2 Steps Greener
5 - 1 Step Greener
6-8 - No Variation
9 - 1 Step Drier
10 - 2 Steps Dried
11 - Hills (Dale if Primary Biome is Hills)
12 - Mountains (Valley if Primary Biome is Mountains)
For our side and point hexes, we roll a 1d6 to determine their type. A side hex has a 50/50 chance of being the same biome as the primary or adjoining hex. A point hex similarly has a one-in-three chance of being the biome of the primary hex or one of the two adjoining hexes.
Region Hex Mapping: Rivers
With some potential adjustments, you can use the river generation method covered in the original post on world-building rivers and watersheds.
1. Only roll once to determine the direction of headwaters from a high elevation
2. Use a 1d12 instead of 2d6 to determine river courses
Landmark Location Placement
Most atlas hexes will not have a landmark location you will need to place. But, for those that do, here are some considerations in placement.
- Avoid placing landmarks along the border of the parent hex
- Take advantage of favorable terrain for placement, such as…
- Arable land for farming
- Naturally defensive landforms
- Travel paths to and from the location
- Water access for drinking, power, and shipping
Region Hex Mapping: Stocking the Hexes
To finish mapping a sub-hex map, we need to pepper the parent hex with several appropriate adventure locales and challenges for our D&D game. However, that’s a more in-depth subject worthy of an independent post. So I think we’ll save that for next time in the worldbuilding process.
Instead, let’s go through how Dungeon Masters can use what we’ve discussed to improve your campaigns.
How to Use This Information
The major takeaway I want for you is not to be overwhelmed by trying to fill in an entire world map all at once. Using this method, you can run a robust and fully-realized level 1-20 D&D campaign in a single atlas hex.
If you’re not in love with worldbuilding and fleshing out a fantasy world that no one else will ever fully experience, DON’T. It should be something you do because it brings you joy and something a Dungeon Master should do after finishing game prep, not instead of it.
In fact, according to D&D’s 2019 surveys, 90% of Dungeons & Dragons come to completion or disband before the player characters reach level 11. That means you can take everything we’ve done here and drop it to another level of magnification by focusing on a single region hex and one Tier 3 endgame adventure for most campaigns.
As DMs, we must first and foremost focus our efforts on what is most likely to come up in the next game session. You don’t need to make the role of Dungeon Master any more complex and challenging than it already is.
Next Time on the World Building Process
The good news is we already know what we’ll go over next time. We’ll discuss the concept of heartlands, marches, and wilds teased previously. The discourse will include how each is different and where they fall on the world map.
Afterward, we’ll discuss how heartlands, marches, and wilds influence the amount, type, and themes of locations that end up stocking our hex map. And to illustrate digging into the details of stocking a hex map, I’ll also be throwing in an example hex!
Thanks for staying around to the end. If you like this content and want to support the blog, you can do it in a few different ways.
- You can follow and message me on Twitter. The notifications remind me to check it!
- You can donate a few dollars through Ko-Fi to help keep the website up and purchase RPG supplements to improve the content
- You can head over to the RRF DriveThruRPG store and pick up one of the PWYW products
Pingback: D&D Region Hex Stocking: Heartlands, Marches and Wilds - RRF
Pingback: D&D Hex Map Region Scale Example World Building - RRF
Pingback: Region Hex Mapping Continent Biome Variation - Red Ragged Fiend