
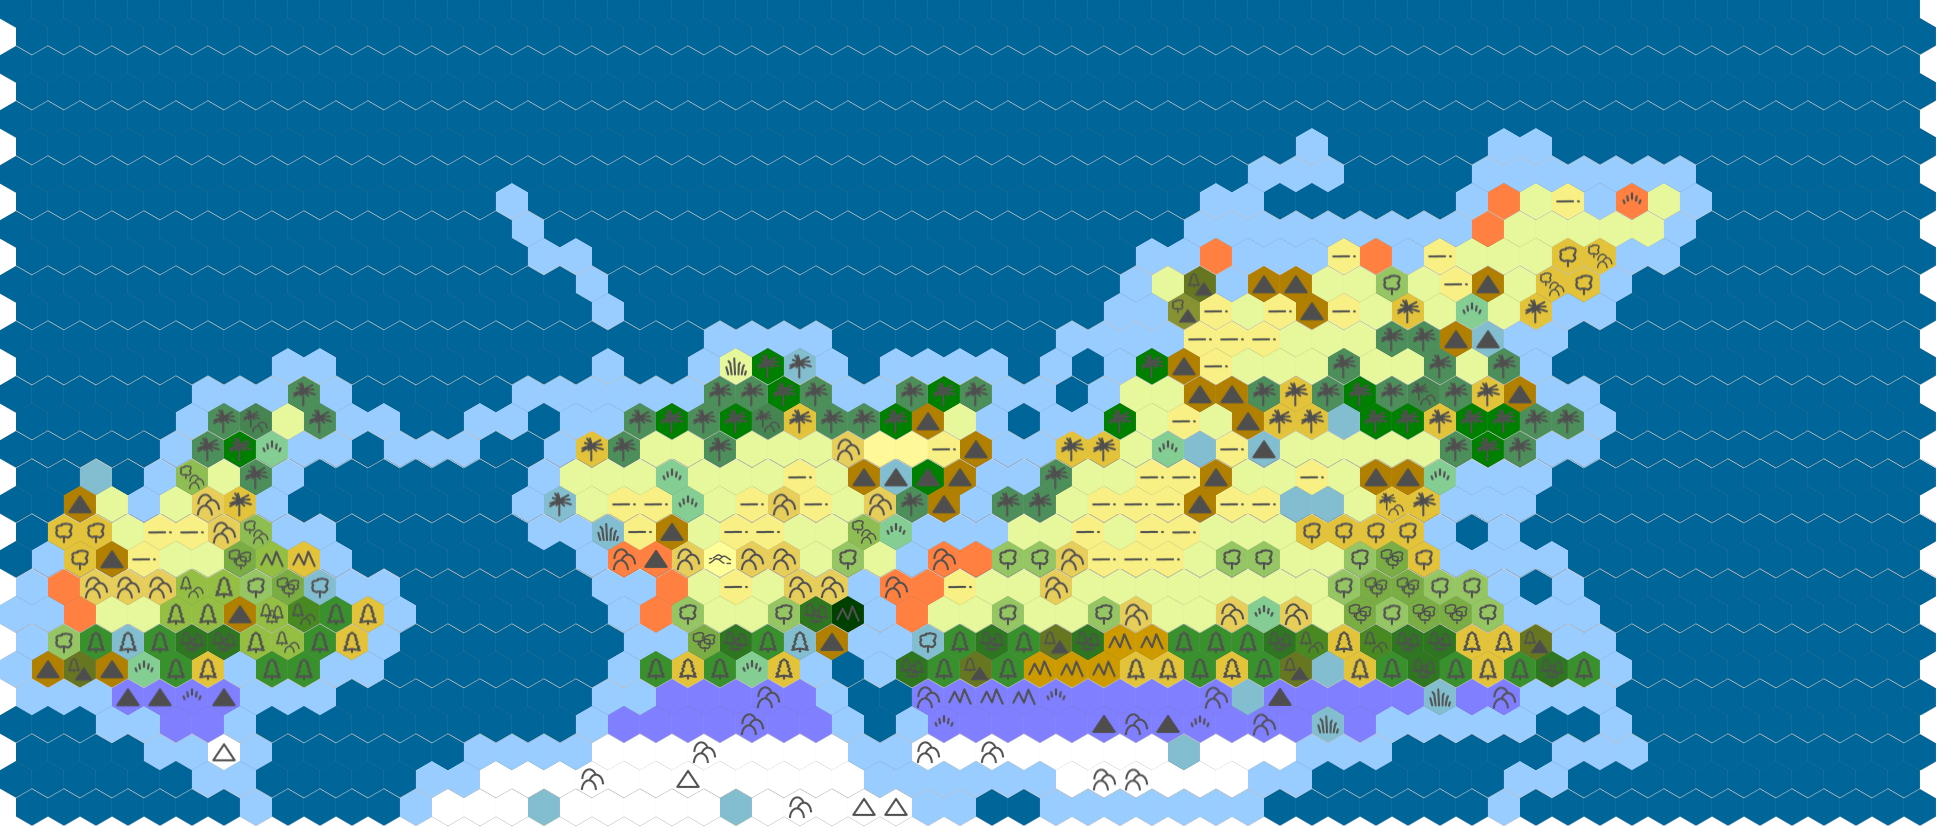
Welcome back to the Worldbuilding series! Last time we mussed up the biomes of your map to give it a little more variety. If you’ve been following along with me in this process, you should have a world map that looks like mine below. We’re closing in on the end of our macro physical geography. If you need to catch up, check out all the Worldbuilding Process Posts. Our last point is dropping some rivers on the map. World building rivers and lakes placements on a world map is often the most common place where world builders stumble. Following along, you will be able to place rivers on your map with confidence. You’ll learn how and where they form and the general rules for how they flow. This section of the world-building series only covers your world’s major rivers, not ALL the rivers of your world. We’re not concerned with the smaller rivers, runnels, creeks, and other tributaries that, by necessity, also exist. As a tip, you’re pretty safe placing a believable small creek or ravine in any area that’s not a desert or place that’s too cold for flowing water.
To get started with this topic, I want to go over why rivers are crucial to the world-building process and why it’s so essential you nail their locations on your map. I like to think if you’ve been following this blog for a while and been interested in world building or world history, you know why rivers are so crucial to a world map and world building, but to cover all the bases, here’s a quick primer.
Why Your World Building Rivers is Important
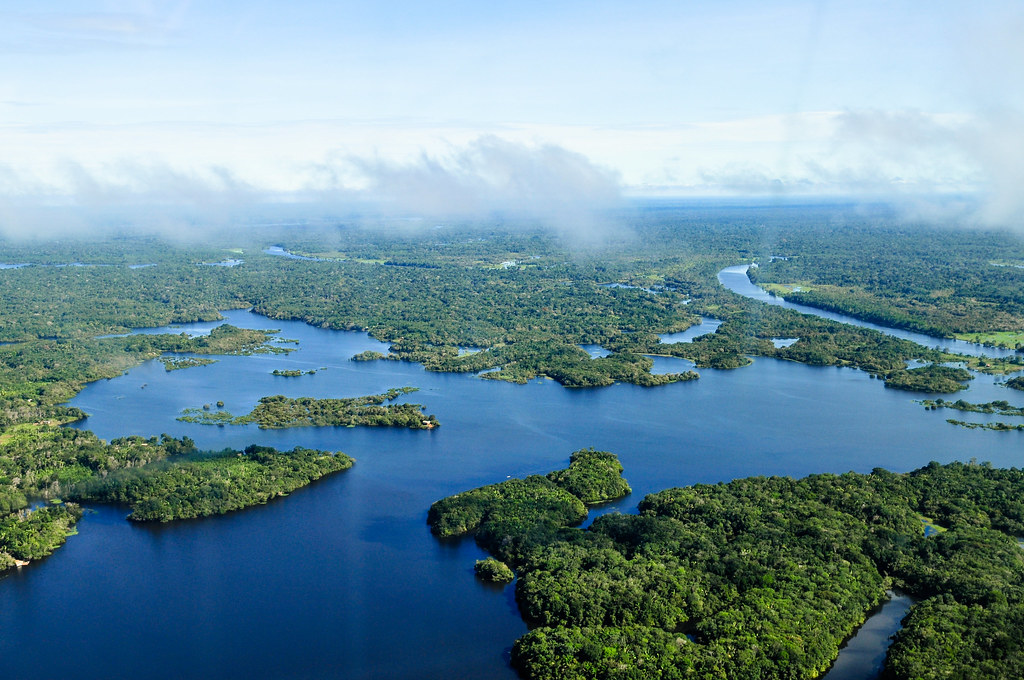
Fresh water is the most important resource to humans in the world. We can expand that precious status to other fantastical resources as well. Even dragons get thirsty. Rivers are vitally important to the development of civilization. The first successful civilizations were river valley civilizations: Ancient Egyptians on the Nile, Mesopotamian (Translates as “Between Rivers”) Fertile Crescent of the Tigris and Euphrates, Ancient Chinese on the Yellow River, and Ancient Indians along the Indus. Why? Well, in addition to dragons, plants also get thirsty and hungry. Rivers carry a regular supply of delicious water and tasty minerals thanks to erosion. These river valleys made it very easy for large-scale agriculture to flourish. Offering people a stable food source that they didn’t have to follow and could store as surplus. Throughout history, most major cities were and are set on a major river. That’s because, besides access to food and water, rivers throughout history provided the easiest means of inland transportation and trade. So, knowing where the major rivers are on your world map will play a big part in developing your settlements, resources, travel, and centers of political power.
Now that we’re we know the why, we should talk about the how. How does the water cycle work? It’s pretty complicated, but we can forego talking about transpiration and other parts to focus on the water cycle’s essential points to world build excellent, plausible rivers for your world map. If you’re not interested in the wonders of the world you live in and how humanity’s most precious resource functions, I guess you could skip the next section. I’ll only judge you a little bit.
World Building Rivers Essential Science: The Water Cycle
All the water in the world is in constant motion and functions in a circular cycle. Let’s start with the oceans. Oceans are the largest reservoirs of water on the planet unless you’re making a non-Earth-like world. It travels around the world, gets heated up, and part of the ocean evaporates into water vapor. Basic science tells us that a substance is always seeking to create equilibrium. This is the same fundamental idea that drives warm and cool ocean currents and the high and low air pressure cells that create wind. As the warm water vapor rises, it condenses into clouds and is then pushed around by the wind. As clouds travel, the water vapor gets cooler, condenses more, and changes matter state into liquid or frozen water. In these forms, water gains weight and can no longer be held aloft by the atmosphere creating precipitation as rain, sleet, snow, or hail. Remember when we discussed mountains and rain shadows? Much precipitation falls on the windward side of high elevations because they force clouds up in the atmosphere forcing water vapor to quickly condense and fall as precipitation before the clouds pass over to the elevation’s (now drier) lee side.
Accidental Spills and Water Cycle Runoff
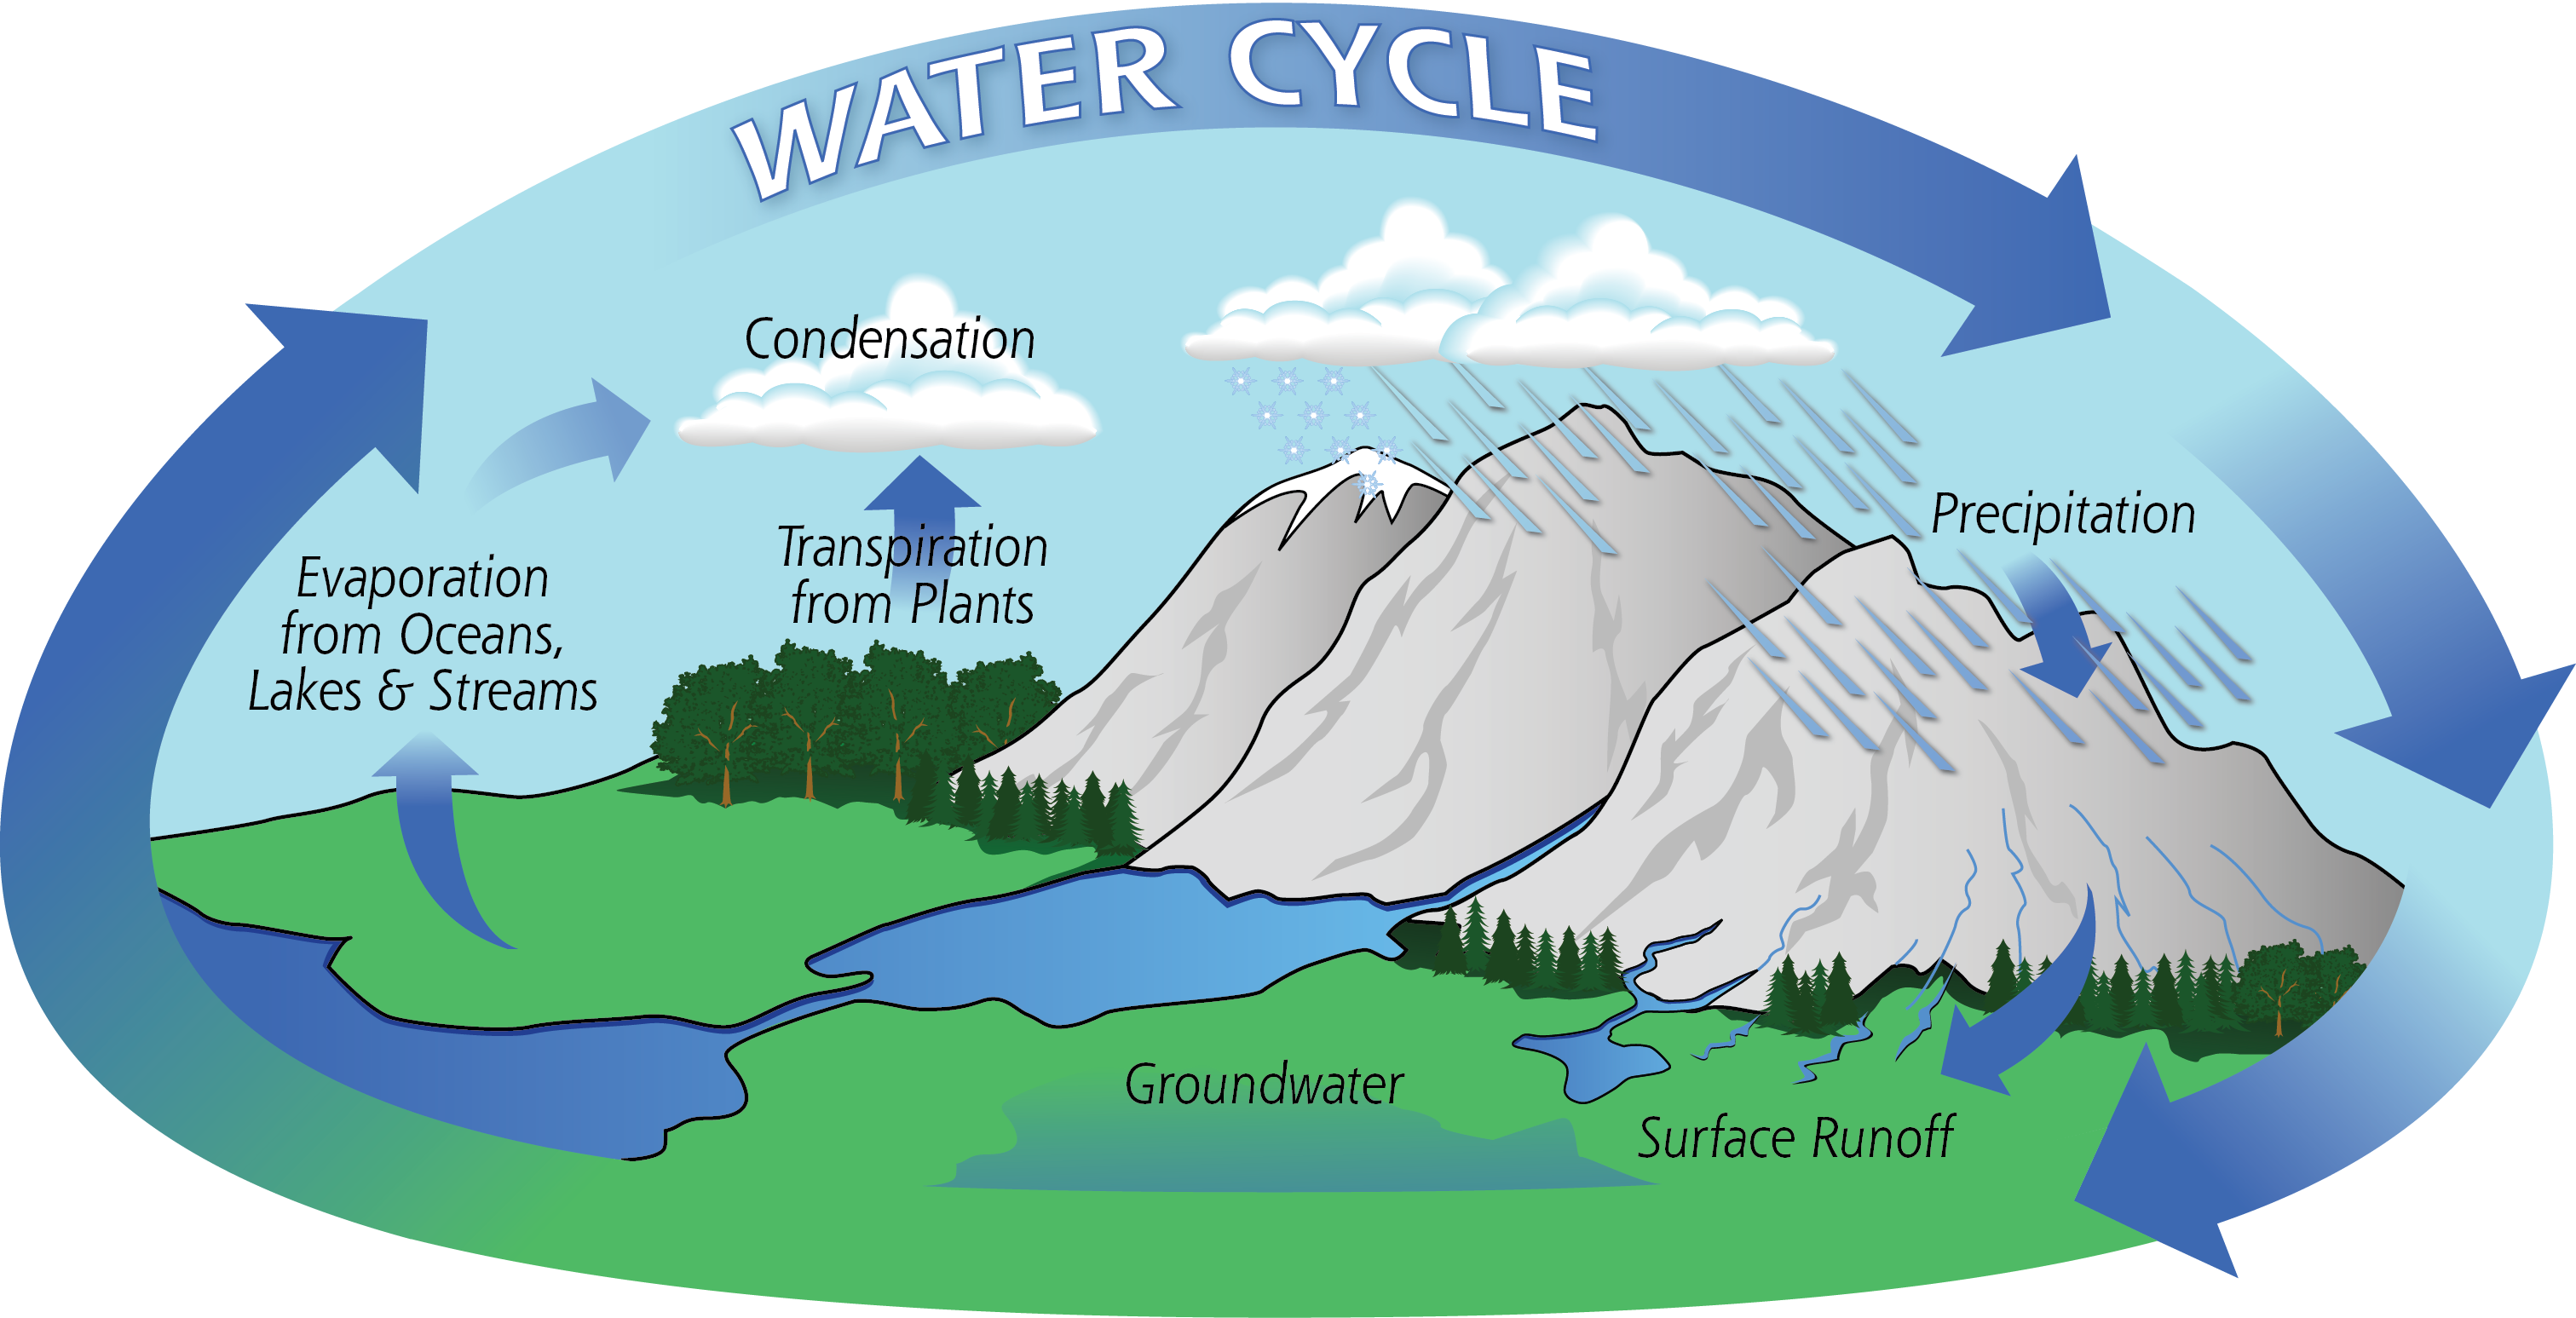
I’m going to make a big assumption here, in your life, you have spilled a liquid. Thought so. Then you will be familiar with the next part of the water cycle. Liquid water collects in the lowest elevation it can find. If you’ve spilled water on a level table, you’ve noticed it beads and doesn’t flow in any direction. In essence, that’s what happens with lakes and wetlands. Spilled it on a soft surface and seen it soak into the fabric? You’re familiar with water permeating the ground and entering the underground water table. And, if you’ve spilled water on a grade, you’ve seen it run fast in little rivulets, rills, and runnels to the lowest elevation it can reach. Yep, that’s a river. OK, cool, but what about snow and ice? The same thing happens with a time delay. It gets warm enough in most latitudes and elevations for accumulated snow and ice to melt in the Spring and early Summer. Once it becomes liquid, the water acts just like rain and desperately seeks the easiest way to the lowest elevation possible. Most of the time, this is the ocean.
The fundamental lesson: on your world map, rivers start in the high elevations and flow downhill to the lowest point they can reach. If you can represent that simple concept in a visual way on your map, that’s half the work.
Watersheds & Catchment Basins

To find your major rivers, you can carve up your landmasses into watersheds. Sometimes referred to as a catchment basin, a watershed is an area of low elevation with a high elevation perimeter. A watershed’s size runs the gamut from a tiny valley in a mountain range to the Amazon. Your perimeter of high elevations, the ridgeline, tells you that all precipitation that falls within this area will seek a common lowest point. It could be a little mountain fjord or the Amazon Delta. Most of the time, it’s going to be the ocean at a river estuary. Looking at your map, you should be able to see places where these watersheds exist. You can start to imagine where the lowest points are in your watershed and how a river would meander through it to the sea.
World Building Rivers and Lakes Quick Tips
You’ve read the why and how of rivers; now it’s time to put that knowledge into action. Before I start detailing the method I used, it’s only one way to map your rivers. Feel free to freehand them and make blue squiggles to your heart’s content. Or if you’re here looking for quick tips to mapping rivers and lakes, I got you. Here are the hot world-building river and lake mapping tips to help you along the way.
Mapping Tips for World Building Rivers, Lakes & Wetlands
- Rivers start in high elevations and always travel downhill
- Rivers start narrow, shallow, and straight and end wide, deep, and meandering
- Rivers always join; they don’t split as they move downhill
- When a river is surrounded on all sides by higher elevations, it creates a lake
- More than 80% of rivers end in the ocean
- Rivers also end (rarely) by going permeating underground or at inland seas, lakes, and wetlands with no output
- Rivers should only touch the ocean at one point
- Try drawing your rivers like trees. Start with the base of the trunk at the sea, move uphill, and split your river into branches and more sub-branches the closer you get elevation ridgelines
- Lakes and wetlands can have multiple inflows but only one outflow
- Lake and wetland outflows in order of likelihood: river, permeates into the ground (often becomes a spring somewhere else), none (eventually creating a salt lake/flat)
World Building River Mapping in 3 Easy Steps
That’s right. We have three easy steps to get your world map’s rivers in order. I will admit, though, easy doesn’t mean particularly quick. This process has a wide variation in completion time depending on the size and number of your landmasses and your individual map’s number of raised elevation tiles. Speaking of high elevation tiles, let’s start there with Step One.
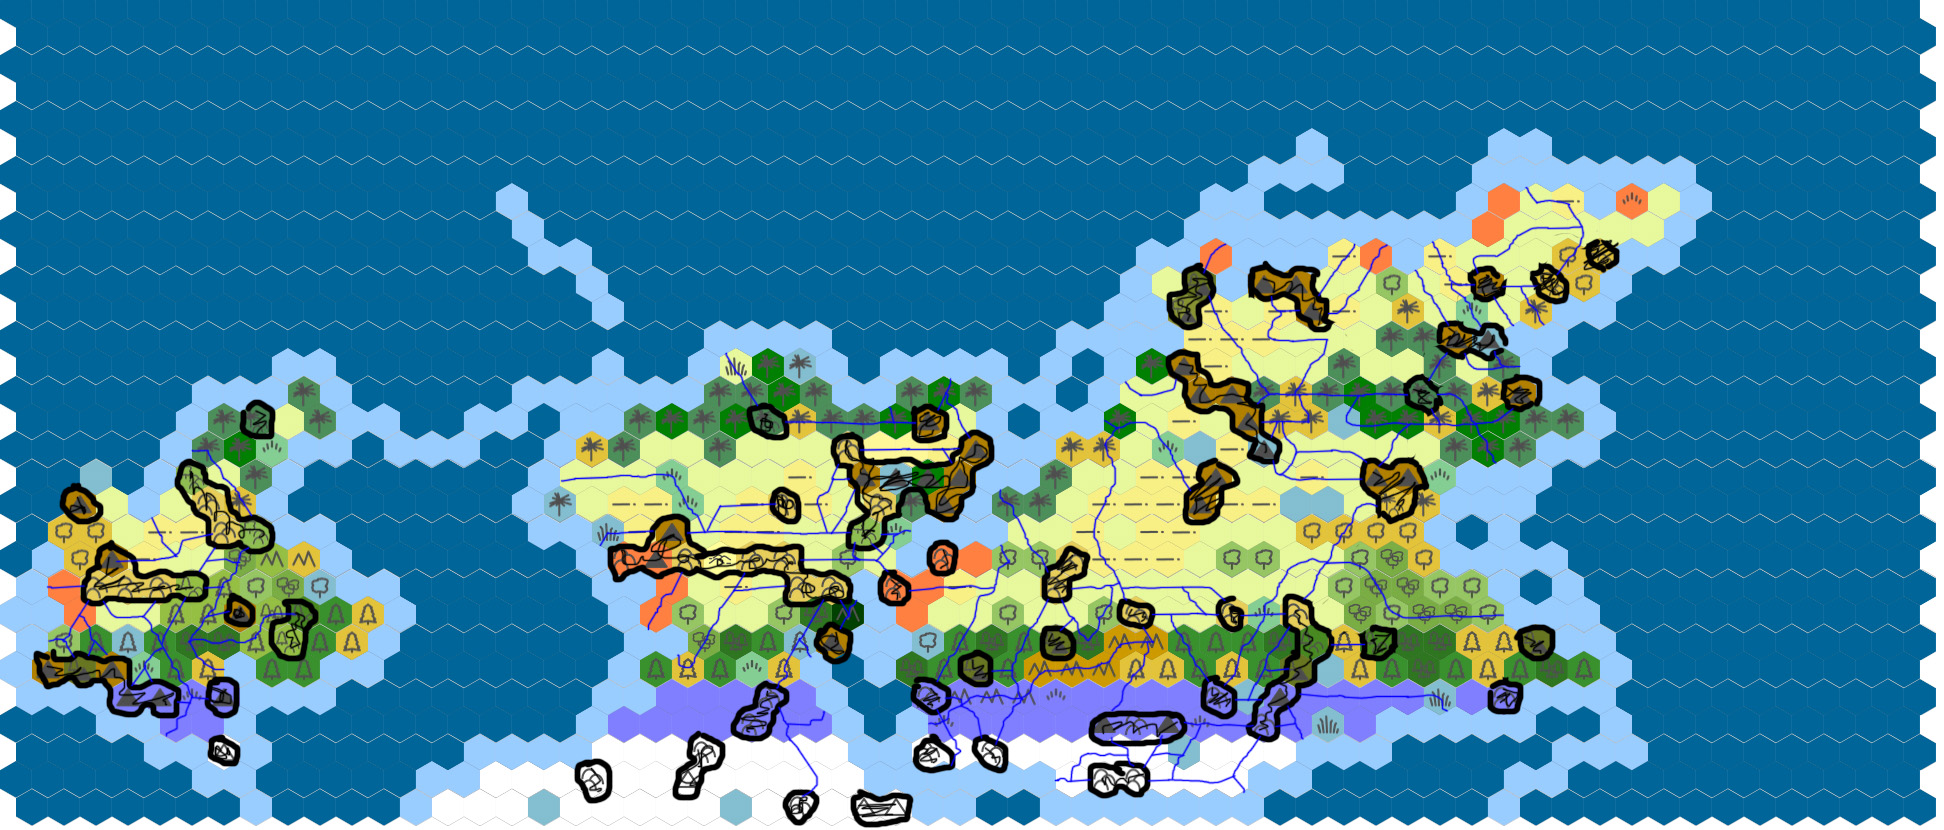
Step One: Circle Your High Elevations
You can do this whole process using editing software like Photoshop or GIMP. You can also do it with a physical copy of your map. Generally, I prefer to do my world building by hand, but I wanted to give you an easy visual aid for this, so I’ve completed the steps in Photoshop. Circle all the hills, highlands, mountains, plateaus, and other raised elevation locations on your map. As detailed in the water cycle section, your major river headwaters will start here. Take a few moments to double and triple-check your map for elevations to circle. I always seem to miss one or more raised elevations, no matter how many times I do this. After Step One, your map should look something like this.

Step Two: Plot Your Rivers
This is the most time-consuming step of the process. For each tile of circled elevation, roll a 1d6 to generate a direction for your river headwaters. I number the directions clockwise: NE, E, SE, SW, W, NW. You can also do the same process on a square grid map using 1d8. Stop rolling and move on to the next tile of raised elevation if the headwaters direction you roll results in…
- A direction with existing headwaters
- Another adjacent tile of high elevation
- An adjacent water or wetland tile
Once you’ve determined your headwaters direction, map the river course freehand or roll 2d6 for each tile.
2d6 River Course Mapping
- Hard Curve to the Left
- Slight Curve to the Left
- Slight Curve to the Left
- Continues Straight
- Continues Straight
- Continues Straight
- Continues Straight
- Continues Straight
- Slight Curve to the Right
- Slight Curve to the Right
- Hard Curve to the Right
Continue mapping your river course until one of the following happens.
- Your river reaches the ocean (estuary)
- Your river runs into another existing river (confluence)
- Your river runs into a lake or wetland with an existing outflow
- Your river runs into another high elevation (confluence). Pick the most suitable low point of your river and roll again for direction
- Your river runs into a high elevation area where it cannot continue. Your river goes underground and ends
- Your river reached 72+ degrees, treat as reaching another high elevation (polar melt)
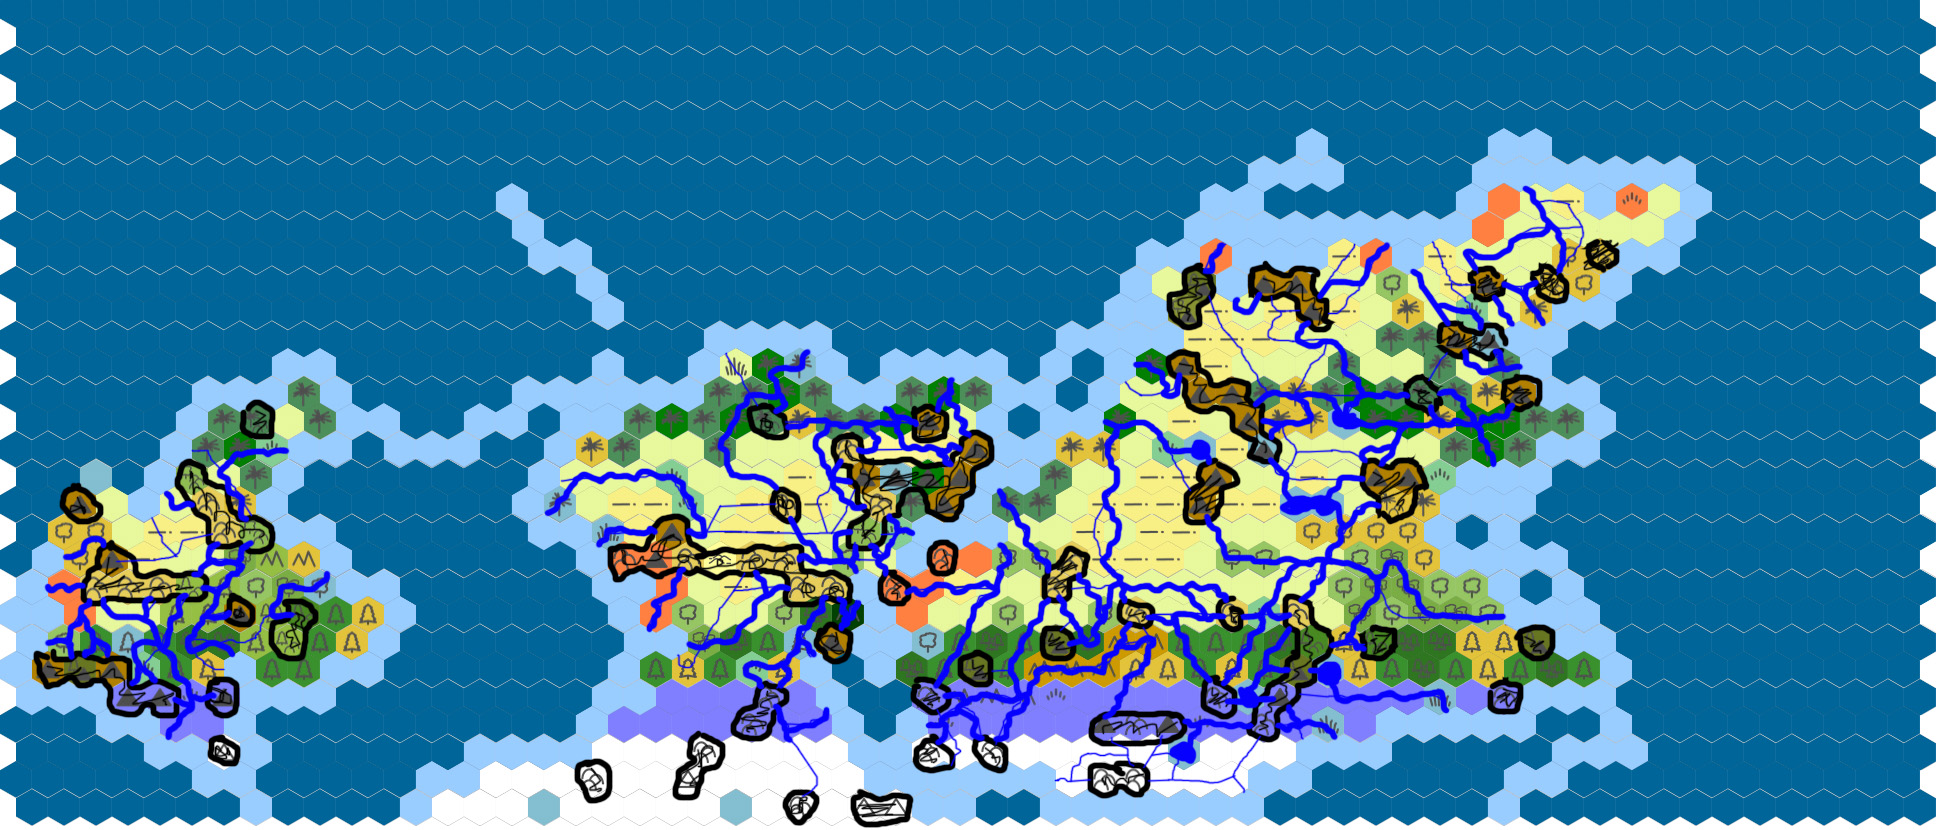
After you finish mapping your river, return to the start at your circled point of high elevation. Roll for new headwaters from the same elevation until the result forces you to move to the next tile. Continue this process until you have rolled out headwaters and rivers for all your high elevations. If your results look anything like mine, your map is now a mess of crisscrossing rivers. That’s OK. We’re going to fix that up in the next step. Here’s what my map looked like after completing Step Two.
Step Three: Refining Your World Map Rivers
While many of your rivers should look good, there is sure to be some wonkiness in the random generation process we need to go back and amend with the human touch. My dice, for whatever reason, like to avoid wetlands and lake tiles and instead drive rivers right through the desert. Using your random rolled rivers as a loose guide, make adjustments for more natural river placement using the following criteria.
World Map River Guidelines
- Try to run your rivers through nearby wetlands and inland water squares. Remember, these squares can have multiple inflows but only one outflow!
- Generally, avoid running rivers through the desert. While major river examples like the Nile do exist, it’s better to avoid when possible
- Make minor course alterations to run your rivers through biomes that receive more precipitation
- Remove any rive portions at 72°+ latitudes, these areas receive too little precipitation, and the temperatures are too low to sustain rivers. Rivers starting at this boundary represent polar/glacial melt. You can keep the river markings as in these latitudes as glacier erosion paths if you want to add that to your map!
- Make sure 80% or more of your rivers end in the ocean.
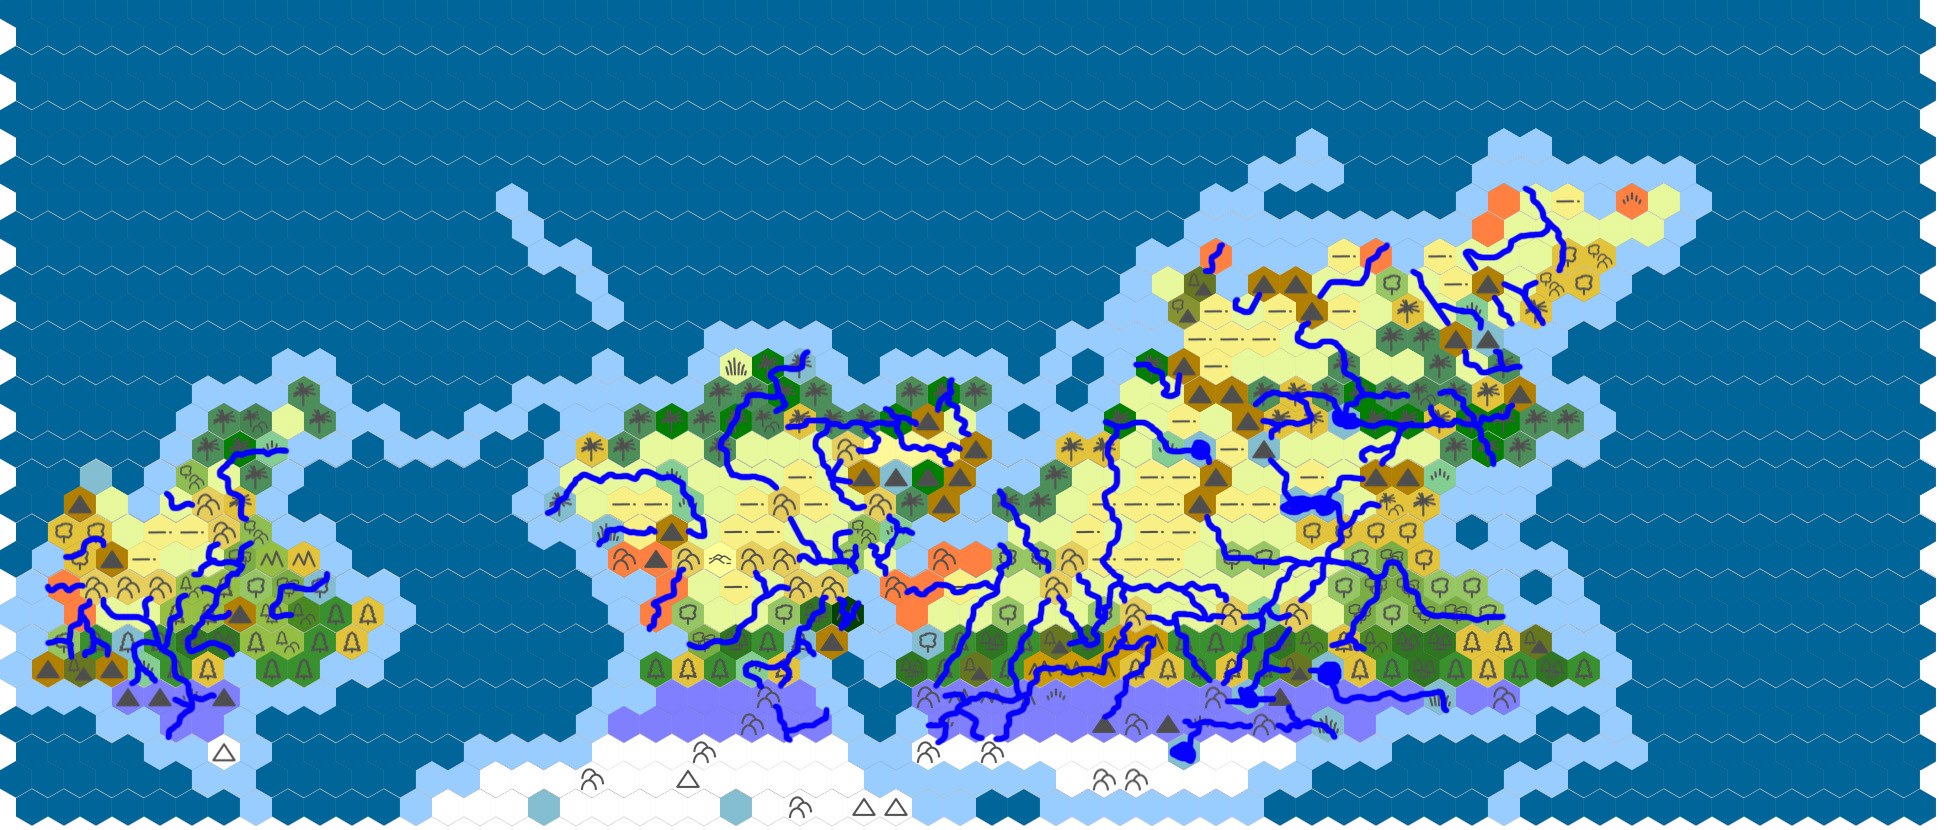
Once you’re finished, you should have a map that looks something like mine. PIC
Wrapping Up World-Building River Placement
When I was first putting this together, I thought about going very specific and granular. I thought about generating and mapping all the elevations, creating elevation bands to account for the three different river courses, and letting the natural result dictate river flow. After looking at many maps, I decided this would be too much wasted time. When you look at a world map, it only conveys the main elevation changes, and that’s why rivers sometimes just look like random squiggles without context to the topography surrounding them. I figured if it’s good enough for real-world maps, it’s good enough for our make-believe maps. The nice part is because of the river course, you can have a head start on assigning elevation variations in your small-scale map because you’ll already know the lowest common elevation for any sub-area. For now, enjoy the map of your natural world. After cleaning up the rivers from Step Two, my map looks like this PIC. While it’s been fun creating the world, we’ll soon be spoiling its pristine majesty with a bunch of grubby people.
In the next section, we’ll give dole out some strategic resources to our world for our future people to cultivate. We’ll add some flora, fauna, and mineral resources that will provide us with an idea of what our people can make, how they can make it, and what resources are valuable trade commodities. Until then, I do want to point out how you can support this world-building series and the website in general. I have Pay-What-You-Want titles through DriveThruRPG. Or you can Buy a Ko-Fi for ONE measly dollar a month to help keep the site running ad/promotion free and prod me to create and share more content or bug me to actually use my Twitter account more! Really, I need the help. We’ll see you soon!
Pingback: River Courses, River Crossings, Tow Boats | Red Ragged Fiend
Pingback: An Introduction to D&D Region Hex Mapping - Red Ragged Fiend
Pingback: D&D Hex Map Region Scale Example World Building - RRF