
Welcome back to a new installment of our ongoing Worldbuilding Process Posts, focused on how to create your own fully-realized world for D&D and other tabletop RPGs. It’s also an excellent resource for writers and other hobbyists who need and enjoy world building. This blog showcases a D&D hex map example of the region level mapping process we laid out in our previous blog.
But, before we get too far ahead of ourselves, do you know everything we do at Red Ragged Fiend? The blog, of course, but there are also PWYW items in our DriveThruRPG shop to get you great free resources, and if you can help by paying a few dollars, your patronage helps keep the work going. It pays for the website and RPG research material purchased to hack and iterate into new ideas for how to run your D&D, or any RPG, game a little better than before.
Also, check out the Twitch streams on Sundays! We’re playing a solo D&D adventure with our newbie high elf wizard, Lia, and her guide, Ott the gnoll, as they investigate a mysterious death tied to Lia’s research on the primordial origins of dragons. Links for everything down below.
But for now, let’s get into the region mapping example!
Choosing a D&D Hex Map Example Area
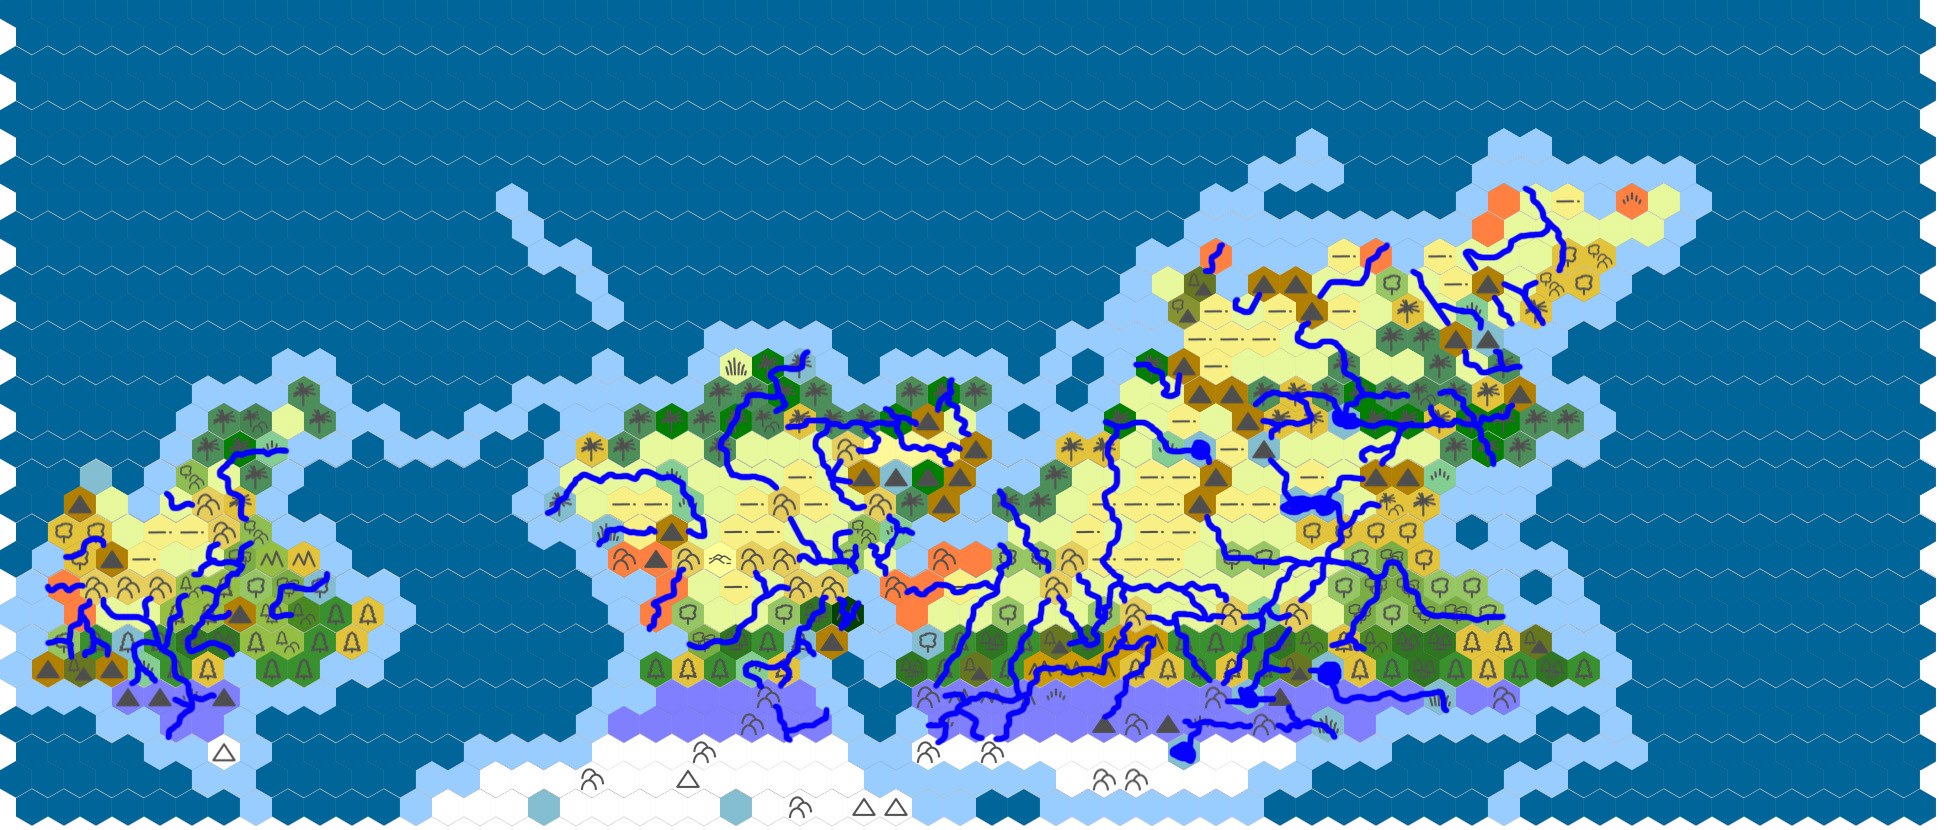
I took a long look at the world atlas map we created to carefully consider what area would be fun and exciting to turn into a D&D hex map example. It also needed to be something to help showcase the strength of the mapping process we created and put it through its steps. In the end, I chose the strand of shallow ocean connecting our western and central continents, an area I’ve been calling The Gyre.
I chose this area to develop for a few reasons. First, I didn’t need to worry about further defining the world’s major rivers from the atlas map because the area is primarily ocean and small islands. Similarly, there are very few Landmark Points of Interest (POIs) to develop. Selecting this site would allow me to focus instead on stress testing the 2d6 Biome Diversification method, mainly how it handles large water areas.
I also wanted to see how our POI assignment process would go with so many water hexes and if the volume of water hex POIs would be too much. And there’s only one way to figure that out: mapping the region. So, let’s get to it.
Preparing the Region Hex Map Example
To prepare for my region hex-mapping example, I first needed to identify which atlas hexes I would use to zoom in and expand upon. This step was fairly easy since I wanted to create an singular D&D hex map of The Gyre. So I selected the 14 atlas hexes that best represented travel between the western and central continents.
Because the scope was already so enormous at 14 atlas hexes, I decided to shirk a little and not include the two Northwest-most hexes of the western continent. While this would have been nice, doing so would have provided us with a region D&D hex map of the two major dominions in the area. For review, you can find more information about the major dominions in the world here: https://www.redraggedfiend.com/world-map-worldbuilding-dominions/. Plus, including the two missing hexes will be easier when we create a more detailed map of the western continent. That way, I’m not doing double work or lopping off the top of the continent when mapping.
Next, with our atlas hexes selected, I created a new map and transposed each atlas hex to its region sub-hex map position. Which essentially meant repeating the boundary marker pattern first introduced here: https://www.redraggedfiend.com/introduction-hex-mapping/. At the center of each of these new region sub-hexes, I added a guide hex. The guide hex is a copy of the atlas hex’s biome type. I also noted the two atlas hexes with landmark fortifications serving as the seat of power for their respective dominions.
And the last point of preparation I did for region hex-mapping was to add a note for each atlas-sized hex area labeling it as a Heartland, March, or Wild area by way of their proximity to the landmark atlas Points of Interest (POIs). Of course, we do that to make stocking our region D&D hex map area clear and easy. For more information about Heartlands, Marches, Wilds, and how to actually stock the hexes with POIs, see our last worldbuilding process post: https://www.redraggedfiend.com/dnd-region-hex-stocking/.
Now, I specifically chose an area that did not have any major rivers noted on our atlas world map. But, if I did, this would be the time to notate an preliminary river course for how the river runs through the hexes. We want to emphasize the PRELIMINARY part of the previous sentence. Because we don’t know the region hexes’ layout yet, we would likely need to amend the river course to avoid rivers running up over hills and mountains. All we need is a reminder to come back and alter the river’s course to make sense after we’ve thrown down our biomes and water-related POIs, like crossings.
With our preparation out of the way, let’s get into the mapping process.
Region D&D Hex Map Creation Steps
The process is suitably intimidating with such a large amount of hexes to stock (500+). You may be tempted to map the area by rows or columns, but I advise against that. You will likely get turned around and confused about where one hex stops and another starts. Doing so will significantly increase the chance you make mistakes assigning biomes and POI occurrences. Fill out the D&D hex map by going one atlas hex at a time. It may seem like a pain in the butt, but it will help to keep things organized as you work.
The first place I want to start mapping is my Heartland hexes. I have two atlas hex landmark locations, and I need to know the atlas hex’s topography to make a smart placement of the two fortifications. I found it very easy to work in this way: Heartlands > Marches > Wilds, especially as most of the hexes in The Gyre are Wilds.
D&D Region Hex Mapping Step One
I grabbed 2d6 and my 2d6 Biome Diversification table and went to mapping the Heartland hexes. With those two atlas hexes filled with their newly diversified biome region hexes, I chose a suitable location close to the center of each atlas hex. I slapped down our atlas landmark fortifications as icons/stamps in Hextml: https://hextml.playest.net/.
With the heartland hexes complete, I moved to the frontier (marches) hexes and the wilds. For now, I left all of our cross-border region hexes unfilled to clarify where one hex starts and another end.
This entire process takes a long time. Don’t worry if you can’t finish the whole D&D hex map in one sitting. Just be sure to leave clear notes so you can pick back up where you left off. By the end, like me, you should have a lovely little hex map that notes the geographic/biome features of the area. It’s nice to see a chunky line of atlas hexes turn into a more nuanced archipelago; a long string of small isles makes it easier to travel between continents by island hopping.
Region Hex Mapping Step Two
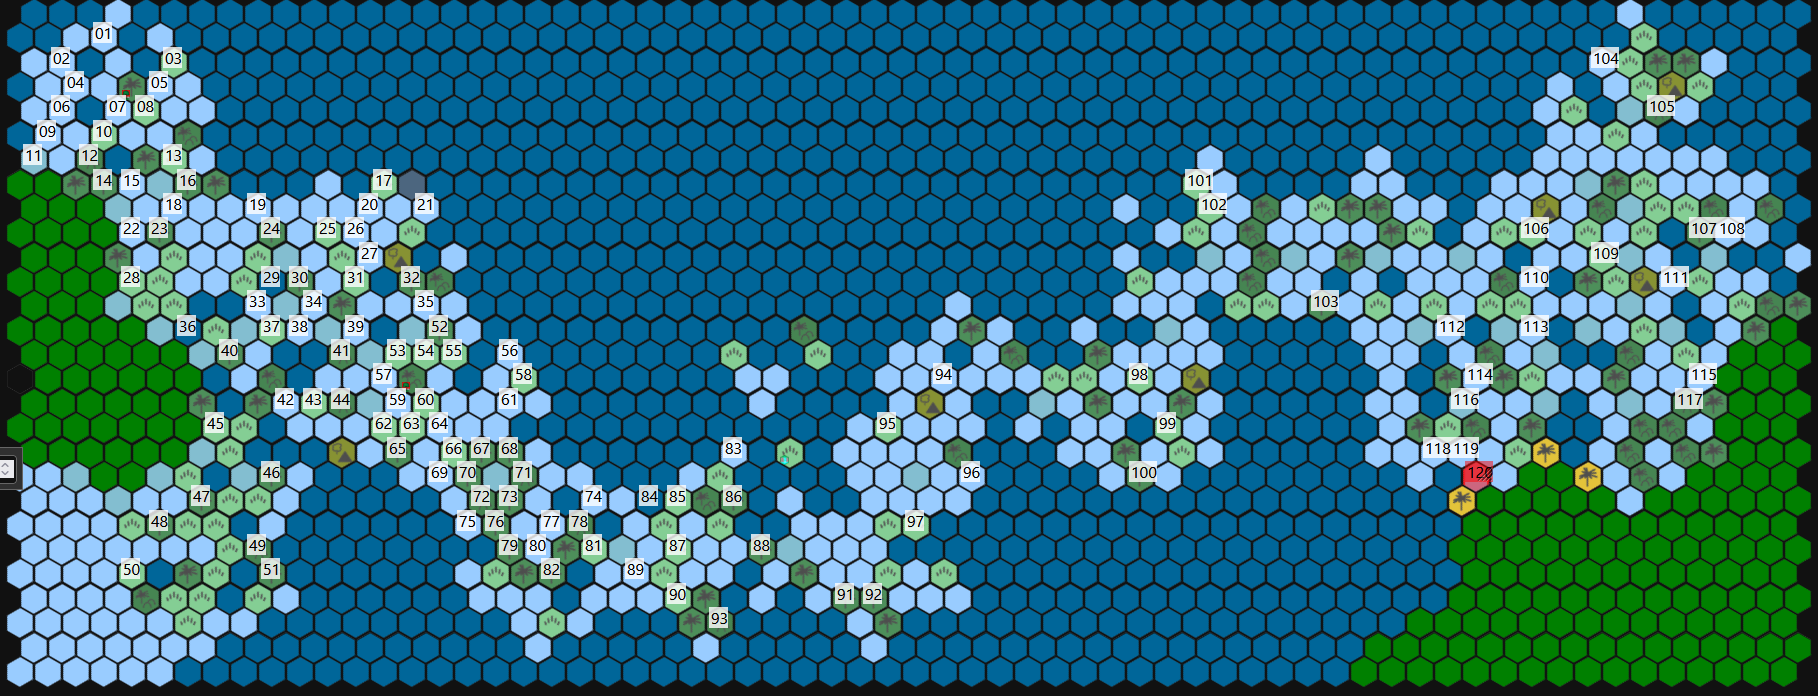
After mapping the biomes, the next step on our to-do list is to create a map key for the area—a small but essential step. Because we need to pack a lot of POI information into a small area, it’s important to create a key, essentially a numbered list of POIs in a separate document, to help keep our D&D hex map example clean and valuable as a visual reference. Instead, we will add a number to the map for each POI.
By cross-referencing the map hex number with our map key, we’ll have all the information at our fingertips in an organized manner. Utilizing a mapping key is vital once you start mapping larger areas like this, where we’ll end up with 100+ keyed locations/POIs.
D&D Hex Mapping Step Three
In this step, we’ll sweep the entire map broadly to find the origin points for our region hex POIs. Like the 2d6 biome diversity sweep, I found it easier to start with the two Heartland hexes before moving on to the March and Wilds hexes. Doing so helped to keep me from accidentally using the wrong set of hex data for my 1d6 POI occurrence rolls.
Of course, every time I spawned a POI, I noted it with “12” or “20” to tell me what size die to roll on the POI Type and Origin table in the next sweep. In the end, we added 120 POI occurrences to the map. I was pleasantly surprised with how well the POI occurrence method did, with most ending up on land hexes and not shallow coast hexes. Also, due to the heartland hexes on the left side of the map, nearly 75% of the POIs ended up on the western 1/3rd of the map. It represents how populated the West side of The Gyre is compared to the East.
How’s your map coming? Well, I hope. We should also put this map into context for what it means for running D&D or other RPGs. Remember that landmark locations represent the top tier of play (party levels 17+ in D&D 5e). We have three of those in The Gyre (two fortifications and a wonder). Using this area alone, we could run up to three separate complete, 1-20 level campaigns in this region without duplicating content.
Moreover, if your group is anything like most that play D&D 5e, campaigns tend to end or fall apart in adventure tier 3 (party levels 11-16). That corresponds to the region hex level of mapping we’re doing here. My region subsection map I’m working on includes 120 different adventure tier 3 locations. So yes, we could run as many as 120 campaigns concluding in tier three play without duplicating content.
Long story short, this one small subsection of the world map could be home to running a lifetime of D&D games. Not too shabby, eh?
Now, with our occurrences noted, I need to discover what each actually is. In the next step, we’ll use our 1d12/1d20 list of general POIs to stock the map key and add some origin/flavor to help us brainstorm what they stand for later.
Region Hex Mapping Step Four
Using the 1d12/1d20 POI Type roll table from the previous world-building process post, I began to fill out the hex-mapping key for the region. Like the previous steps, I started with the Heartlands, moved to the Marches, and finished with the Wild hexes. It just helps to keep everything organized while building out the area.
I rolled a twelve- or twenty-sided die for each POI occurrence to determine the type of POI present in the hex. I also added an origin/flavor point for the POI.
For example, rolling a holding is simple enough, and I would add some details like it is just a keep or a complete castle with baileys, moat, and walls with hoardings and towers. Then I would roll on the POI origin/flavor table based on the type of hex (Heartland, March, etc.). So I could end up with a peel tower with a “Weird” origin/flourish or a very grounded motte and Bailey with an “Artificial” origin/flourish.
Once all the POI types and origins were complete, I found it easier to go back then and roll the sub-origin for each POI, i.e., drilling down from a “weird” peel tower to a peel tower that has some fiendish (weird subtype) motif. Does a demon rule over the tower? Are they demon summoners? Is it a hellish fortress that’s been transplanted to the material plane? Don’t know. It could just mean the Duchess’s coat of arms features a fiend or they’re part of a famed tiefling bloodline that can draw their lineage back to an infamous fiend.
The truth is, I won’t know until I develop the area more, such as when I start prepping an adventure/campaign in the area. The point of the exercise is to record the basic foundation of the hex’s POI and a little flourish/origin/motif to use with it, so I don’t have to start from a blank page when building out the point of interest later.
“The Gyre” D&D Hex Map Key
1 Diving Bell, Automated Construct
2 Sea King’s Whisper (Roadhouse & Dock built into a giant nautiloid shell) w/ village pop. 850
3 Construction: Plasmoid’s Mage Tower (CR 16)
4 Directional Signage, Giant seahawk (Roc) skull, NW to Sea King’s Whisper, E to Huca
5 Construction: Huca warband creating semi-permanent camp on psionic ooze/mud
6 Construction: Monster Lair, Humanoid Cultist (Cleric, CR 13) base to eradicate underwater humanoids
7 Directional Signage, Giant Oyster shell, NW to Sea King’s Whisper, NE to Huca, E to Crested Otyugh Hunting Lodge
8 Crested Otyugh (CR 14) Hunting Lodge & Preserve
9 Wonder, volcanic forge/crucible w/ village pop. 950
10 Keep, Duke/Giant (CR 18) w/ village pop. 400
11 Isolated Homestead, Satyr (CR 15)
12 Monster Lair, Star Spawn Seer (CR 14)
13 Religious Commune, w/ village pop. 500
14 Keep, palisade, ditch/moat, Duke/Deva (CR 19)
15 Wonder, Fairy Ring Atoll with a pack of dire blink dogs (CR 12)
16 Ruin of Isolated Homestead, Dragonborn pariah drowned, haunted by dragon ghost (CR 13)
17 Monster Lair, Devourer (CR 13)
18 Ruin: Warning Sign, buoy sign covered in barnacles, Watch out for Ghost Dragon to NE
19 Treasure Rumor, Sea Wyrm’s Vault, Looted
20 Ancient Battleground between Giants & Undead, Haunted (CR 14) no Loot
21 Meetingplace, Holiday Ground between the Huca and Tu’i people (amiable relations atm)
22 Construction: Religious oracle bath of viscous, honey-like ooze
23 Monster Lair, Retriever (CR 14)
24 Monster Lair, Behold in Lair (CR 14)
25 Warning Sign, 7-sided, Fey pillar in mirror fragment mosaic, in Sylvan warning of Beholder to West
26 Wonder, Dense kelp forest
27 Keep, Duke/Kirin w/ village pop. 250
28 Ruin: Gray Ooze spawning pool (lair), supernaturally frozen, haunted (CR 16) w/ loot
29 Ruin: burnt out remains of mollusk hunters’ inn, Active w/ loot (phoenix nest, CR 16)
30 Isolated Homestead, Narzugon (CR 13)
31 Boardwalk crossing, tolled by an adult copper dragon CR 14
32 Blue Amber Tree Camp, copse of feywild trees that produce crystalline blue amber that can be melted to use as an epoxy (sovereign glue)
33 Hazard, “Heavy” Grease, area filled with detritus. The grease slick sticks to things and the more they move the denser the grease becomes causing it to sink with any stuck creatures or items, over time and without movement the grease will rise back to the top of the water
34 Wonder, Demonic Chimney, created Sulfur vent connected to the chaos forge, w/ village pop. 850
35 Crossing, Ship for hire Marilith captain (CR 16)
36 Active Conflict Area: Fortification, Nagpa (CR 17) vs Adult Red Dragon (CR 17) fighting over a sunken treasure galleon
37 Isolated Homestead, Pariah Yuan-Ti Malison (CR 16)
38 Monster Lair, Bael (CR 19), Vault
39 Religious Site, Saint Reliquary w/ village pop. 850
40 Monster Lair, Dryad (CR 13), Natural Structure
41 Monster Lair, Dragon Turtle (CR 17), Vault
42 Directional Sign, Exposed Coral Reef w/ directions created using shards of shell
43 Wonder, Misty Mangrove, Empty (Fey Bermuda Triangle)
44 Directional Sign, lighthouse with a persistent elemental flame
45 Ruin: Roc’s Nest, Empty w/ Loot
46 Settlement (1.5k), Worshiping a Ki-rin
47 Remains, Fire Giant Dreadnought (Dehydration?)
48 Remains, People and animals killed by Invisible Stalkers (CR 6)
49 Isolated Homestead, “Civilized” Dire Troll (CR 13) w/ Headband of Intellect (Int 19)
50 Hazard, Putrid Shoals (Shadowfell, Expedites Decay of Organic Material)
51 No Trespassing Area, Unicorn Grove (Sacred Ground)
52 Monster Lair, Pudding King (Black Puddings) Vault
53 Hazard, Automated Defensive Mines & Landmines (Constructs)
54 Treasure Rumor, Cloud Giant (CR 9), Trapped
55 Treasure Rumor, Cadaver Collector (CR 14), Guarded
56 Informative/Warning Sign, Buoy Invitation to location 58
57 Hazard, (Sunken Hellfire Engine [Ship])
58 Religious Site, Evil Soul Monger(s) (CR 11) Knowledge Repository
59 Religious Site, Hospital (Leper Colony?)
60 No Trespassing Zone, Neothelid (CR 13) Territory
61 Settlement (6.5k), Ocean Platform (Construct) Trade Industry
62 Crossing, Sludgy Ship Channel (Ooze)
63 Settlement (8.5k), Construct Bog Iron Collection/Smelting
64 Directional Sign, Pegasus Messenger Station
65 Crossing, Flameskull (CR 4) Guide through Shrieking Forest (Banshees, CR 4)
66 Conflict Area, Adult Green Dragon (CR 15) vs Cyclops (CR 6)
67 Holding, Mummy Lord (CR 15), Village pop. 775, Squid Ink
68 Holding, Living Strong Construct Walls, Village pop. 650, Wearable Animated Armor

69 Directional Sign, Signal station of undulating pale green light (Fey)
70 Warning Sign, Totem of a Marilith (CR 16) warm and humming
71 Religious Site, Dragon Bone Ossuary/Shrine, village pop. 825
72 Keep, Tiger Shark motif, village pop. 875
73 Treasure Rumor, Giant’s Crypt (Looted)
74 Keep Wall Moat Towers, Nautilus motif, village pop. 950
75 Construction: feywild Eladrin creating a city
76 Ruin: Monster Lair, Dao (CR 11)
77 Conflict Area, Giant Octopus vs. Ochre Jelly
78 Directional Sign, Hag Coven Grave Marker
79 Informative/Warning Sign, Giant massive stone calendar & omen
80 Planetar’s keep w/ wall, village pop. 950
81 Wonder, Treant mangrove (Monster in residence)
82 Remains, Githyanki astral ship, crew suffocated
83 Remains, Starved Rot troll(s) (CR 9)
84 Crossing, Hirable Air Elemental for sailing or underwater travel
85 Construction: Creating a shrine to a hag artifact
86 Feywild Orchid Hot House w/ Supplies (Cache)
87 Construction: Isolated Homestead out of a mangrove tree, Quaggoth Thonot (CR 3)
88 Crossing, Living Subterranean Elevator (Earth Elemental, CR 5)
89 Wandering Monster, Foraging Marid (CR 11)
90 Ruins of the Kingfisher: Keep/Wall/Moat/Tower/Outer Wall, Village pop. 450 (Quetzalcoatlus, CR 2)
91 Gibbon Keep, village pop. 1000
92 Wonder, Howling Cenote w/ Air Elementals (CR 5)
93 Angel’s Hold (Keep/Wall/Moat/Towers), village pop. 400 (Deva, CR 10)
94 The Everafter, Demilich’s (CR 18) permanent Magnificent Mansion spell
95 Swamp of Statues, No Trespassing Area (Basilisk, CR 3)
96 Glass Port (Travel Haven, https://media.timeout.com/images/105835351/750/422/image.jpg), pop. 450 (Behir-made glass, CR 11)
97 Singular Fossilized Feywild Jungle Tree, Signs (Sylvan) hang from it pointing to (86, 92, 95)
98 Isle of Eyes, Undiscovered Natural Resource (Death Kiss [CR 10] breeding ground & harvesting)
99 Treasure Rumor, Cache (Easy Pickings) Myconid Sovereign (CR 2)
100 Boundary Stone, Warning, Open Ocean to South, Apparent shipwreck survivors (Green Slaad, CR 8)
101 Smoked Swamp (Hazard), Tar Ooze (CR 6, https://www.5esrd.com/database/creature/ooze-tar/)
102 Seadragon Beach, Settlement (2.5k)
103 The City Reborn, Settlement (6k)
104 Salt Springs Wanderers’ Gathering (Haven), village pop. 750 (Steam Mephits CR 1/4)

105 Directional Sign, False (Trapper, CR 3) with nonsense signage
106 Faerie Light Mangrove, village pop. 750 (Death Dog, CR 1: search “bush dog”)
107 Isolated Homestead, Couatl-blessed Aarakocra (CR 1/4) Divine Sorcerer
108 The Soup (Hazard) Aberration-style Shadow Realm Bermuda Triangle
109 Treasure Rumor, Fake Relic, Death Slaad (CR 10)
110 Wandering Monster, Lost Doppelganger(s) (CR 3)
111 Temple to a Solar (CR 21)
112 Remains or a Powerful Relic, Grick (CR 2) Attack?
113 Temple housing Marid (CR 11) writings
114 Pixie (CR 1/4) infested shipwreck (lair
115 Oracle (Religious) or Giant Constrictor Snake (CR 2)
116 Sunken Vault of the Fomorian (Lair, Keep Things Out)
117 Psychic Messenger Station to 103, Black Pudding (CR 4)
118 Warning: Stay Away, Menhir covered in Violet Fungus (CR 1/4)
119 Strait (Crossing) of the Silver Wyrm (Young Silver/White Dragon, CR 9)
120 Kelpie Atoll, village pop. 800 w/ Needle Blights (CR 1/4)
D&D Hex Mapping Region Step Five
If you’ve been following along, you should have a nearly completed D&D hex map of the region and a nice key for your POIs. In this step, we’ll put the finishing touches on our region D&D hex map. You probably realize now that you have some blank hexes still on the map, hexes that are divided between two or three atlas hexes, and it’s time to fill those in.
When it comes to cross-border hexes, there are only two things we need to remember. First, POIs never happen on cross-border hexes; they would make shifting between map layers too tricky. So, the hexes just don’t have any notable POIs. And second, we use the atlas hex biomes as the origin for these region hexes.
For example, if the hex is situated on the border of a coastal shallows atlas hex and jungle island hex, I would roll a 1d6. On a low roll, the hex is a coastal shallow; on a high roll, it’s a jungle. Simple and easy to do, and the same can be done with cross-border hexes between three different atlas hex types by grouping the results of a six-sided die as 1-2, 3-4, and 5-6.
Other final touches include creating watersheds and river courses for this map magnification. Now, I chose an area that would avoid this, but it needs to be addressed when mapping landmasses at each level. You can find the information to accomplish this in the world-building blog on the topic: https://www.redraggedfiend.com/world-building-rivers-watersheds/.
Similarly, we want to create overland travel routes/roads to connect the civilized (1-12) POIs. Make sure to connect any rivers and roads with “crossing” POIs. Using rivers and routes together should add a level of verisimilitude and authenticity to how people in the world would move around the area.
If you’re feeling overwhelmed, take a step back. Regarding rivers and roads, I think it’s best to err on the side of not enough than too many. Not every tiny hamlet needs a road to it or a map that’s lousy with waterways. Adding smaller trails and creeks later is much easier than redacting a large river or highway after the fact.
Quick Tips on Mapping Roads & Routes
It would be worth it to organize my thoughts on this particular section in a full-blown blog entry, but here are a few quick and dirty road tips you can use for your mapping adventures. First, let’s start with what a road or route is, and what it represents. A road, footpath, trail, etc. represents regular, high-volume traffic between two locations (relative to the technology, population, and setting). That makes sense, right?
There are three primary considerations for determining the path of an overland route: speed, simplicity, and safety. Let’s start with speed.
Speed
All things equal, we’ll draw a straight line between destinations because that’s the fastest path. Organic routes (not-planned roads) deviate from this usually because a straight line is not the simplest or safest path for traveling between the destinations.
Simplicity
Ask yourself this question: “What obstacles are in the way?” Sure, we’d love to walk a straight line from here to there, but there’s just a tiny, insignificant MOUNTAIN RANGE in the way. Well, walking up and down a mountain isn’t easy; it’s hard. Even harder if you’re trying to move beasts of burden and vehicles over a mountain. There are switchbacks to be made, inclines to be graded, passes to be marked, and even then, the weather will likely shut the pass and make the route unviable for part of the year.
Obviously, it’s much simpler to go AROUND the mountain range in that case. Now, if you were in Wyoming and wanted to get to Oregon, going around the entirety of the Rocky Mountains wouldn’t be any faster or simpler. It’s all about the context of the specific situation.
No sane person is going to spend the exorbitant expense to cut a straight road through a forest if they can go around it without too much wasted time and effort. It’s why old roads lead to river fords or ferries because they’re simpler and safer than constructing bridges that often were washed away when rivers rose.
Safety
Is the route safe and secure to use? Since we’re talking about D&D, I’m sure your mind, like mine, often jumps to bandits, goblins, orcs, and other archetypal monsters that attack travelers. However, there’s more to a safe route than avoiding attacks, like the things we take for granted traveling today. Is there grazing and water access? What about weather, footing, and hazards, a la the Fellowship trying to cross Caradhras in LOTR. Are there any border skirmishes, dangerous animals, and other threats native to the area that would better be avoided? Or just avoiding getting lost.
Certainly, you’ve gotten turned around and lost at some point. Now imagine that situation without signage, people, compass/GPS/map, or internet access to help you get your bearings. These are the sort of issues that prevent high-traffic routes through deserts.
It’s why sight lines and landmarks are so important. And why old roads tend to follow the borders of landforms and rivers. The reason sometimes routes zig-zag between easy-to-note landmarks rather than relying on dead reckoning. Modern video game treasure maps do this very well by providing the general area, 2-3 easy-to-ID landmarks/features, and the “x marks the spot” in relation to the identified features. All of it’s communicated with little to no text.
If you keep Speed, Simplicity, and Safety in mind when connecting travel routes between your destinations, you should have no trouble while mapping.
Wrapping Up Our Region D&D Hex Map Example
And that’s about it. Hopefully, this example will help show you how to use the worldbuilding system we’ve been using to dial in the magnification from the atlas hex world map. Now, if you want to see me do this process live, check out my Sunday streams at https://www.twitch.tv/redraggedfiend, where we’re doing a D&D 5e Solo RPG adventure and building out the world with hex crawling. You can catch up on previous episodes at https://www.youtube.com/@redraggedfiend. And we have PWYW titles on DriveThruRPG, and you can ask me questions and chat over on Twitter.
I think in the next Worldbuilding Process post, we’ll talk about languages. We’ll talk about the importance of language in our games, how we will use them in our world, and look at assigning language/dialects across the world map. We may also get into naming conventions for place names if we have enough time. So make sure to check the website for new posts and give it a read!
Pingback: Region Hex Mapping Continent Biome Variation - Red Ragged Fiend